Tekton Pipeline
Video
Intro
In the previous lab, we introduced Tekton and created a Tekton Task. In this session, our objective is to link a sequence of pre-existing tasks to form a comprehensive Tekton Pipeline. This pipeline will encompass the entire process of building a Quarkus Java application, generating a container image, and subsequently deploying the image to our cluster.
Lab
Prerequisites
- OpenShift Cluster 4.X with Openshift Pipeline installed
Optional
- tkn cli
- If using the CLI with Openshift it is highly recommended you download the tkn cli through the Openshift console to insure you have the correct version. Cli can be found under
'?' -> Command Line Tools
- If using the CLI with Openshift it is highly recommended you download the tkn cli through the Openshift console to insure you have the correct version. Cli can be found under
Clone Example Application
First lets clone our example application:
git clone https://github.com/redhat-appdev-practice/tekton-labThis repository houses a contains Quarkus application that you're encouraged to delve into. However, our focus centers on the contents within the .infra directory, encompassing two subdirectories. The chart folder holds a Helm chart designated for our deployment purposes. And the pipeline which houses the Kubernetes objects directly associated with our pipeline.
Details
The Tasks created for this demo are mostly simplified versions of the ClusterTasks included with Openshift Pipeline Operator. The existing ClusterTasks are good starting points for creating the Task specific to your team.
One thing you may notice that was not covered in the previous lab is the use of env: to convert task parameters into environment variables. This is a best practice that makes it much easier to test scripts outside of your Kubernetes Cluster.
Kubernetes Setup
Now lets create our pipeline-example namespace or reuse that namespace from the previous lab.
And lets upload our custom task into our pipeline environment, from inside of the newly clone repository run
oc apply -f .infra/pipleline/task/Creating our Pipeline
Lets create our pipeline!
TIP
In the video I ues the Openshift UI to build out the pipeline. I highly recommend checking it out as the UI vastly simplifies the inital creation of a pipeline.
To start with lets create a two step pipeline. Step 1 will clone our code. Step two will deploy a simple helm chart stored inside of that code.
In order to install this task copy the following into a pipeline.yml file then run either oc apply -f pipeline.yml or kubctl apply -f pipeline.yml
apiVersion: tekton.dev/v1beta1
kind: Pipeline
metadata:
  name: example-pipeline
spec:
  params:
    - description: Repository Url
      name: repo-url
      type: string
  tasks:
    - name: git-clone-task
      params:
        - name: repo-url
          value: $(params.repo-url)
      taskRef:
        kind: Task
        name: git-clone-task
      workspaces:
        - name: output
          workspace: source-repo
    - name: helm-deploy
      params:
        - name: image-name
          value: example-deploy
        - name: image-tag
          value: $(tasks.git-clone-task.results.commit)
      runAfter:
        - git-clone-task
      taskRef:
        kind: Task
        name: helm-deploy
      workspaces:
        - name: source
          workspace: source-repo
  workspaces:
    - name: source-repo
If the apply worked, and you navigate to Pipelines -> Pipeline there should be a pipeline named example-pipeline that looks like this
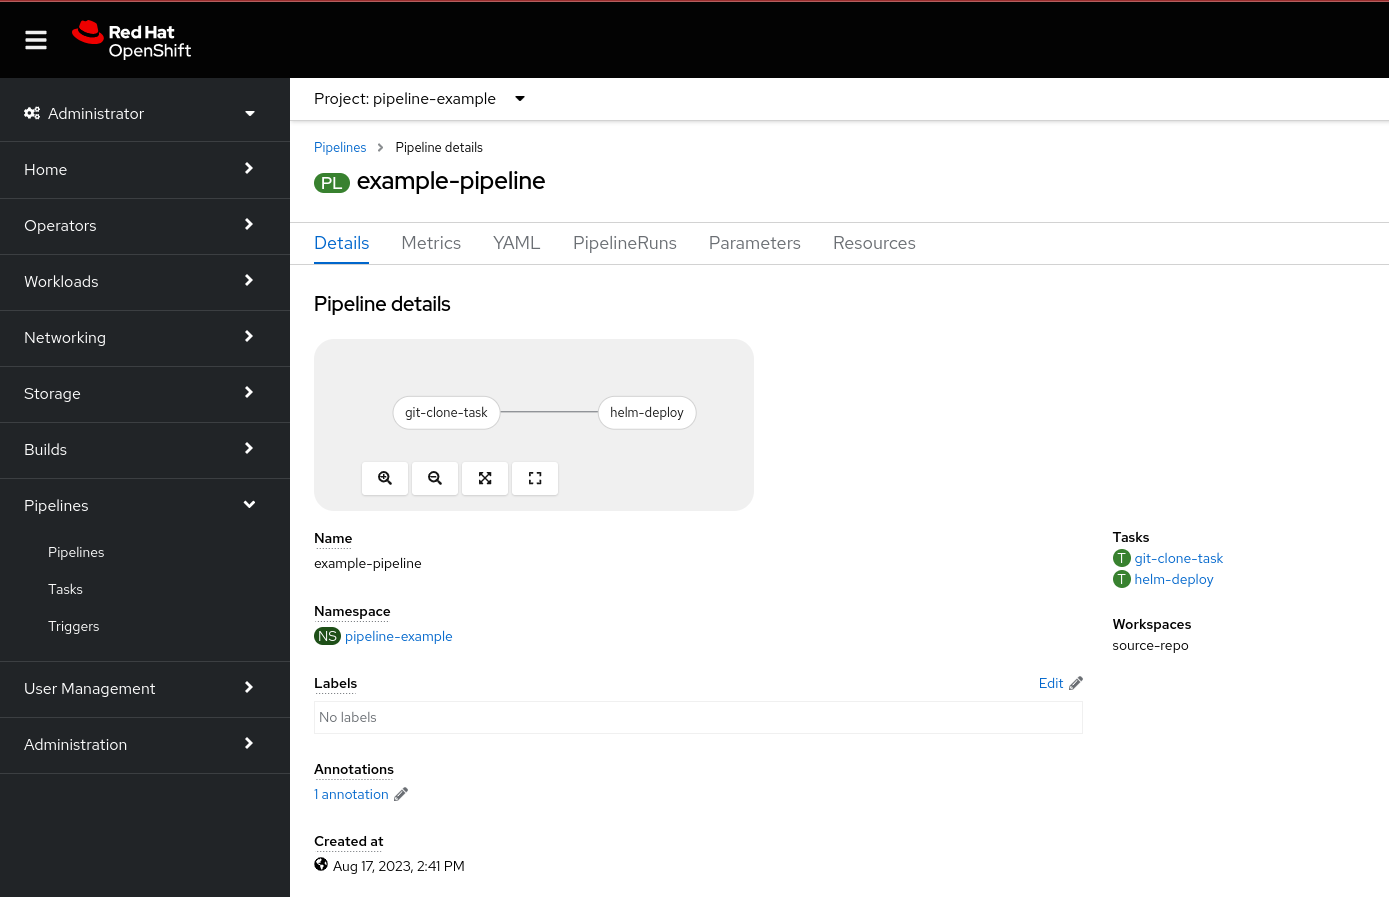
Now lets examine each of the section in our input yaml
Params
Similar to Tekton's Task pipelines, our pipelines include a parameters section that enables us to define distinct values at the beginning of each execution.
  params:
    - description: Repository Url
      name: repo-url
      type: string
Workspaces
Mandatory workspaces are specified at the Pipeline level and generated during the PipelineRun phase. This allows the transfer of data, such as our source code, across Task. Note that the workspace is also invoked within the Task component. By specifying the same workspace in git-clone and helm-deploy we allow the source code cloned by the git-clone task to be utilized within the helm-deploy task.
- name: git-clone-task
  ...
  workspaces:
    - name: output
      workspace: source-repo
- name: helm-deploy
  ...
  workspaces:
    - name: source
      workspace: source-repo
Steps
Finally we have the steps to make up our pipeline:
- name: helm-deploy
  params:
    - name: image-name
      value: example-deploy
    - name: image-tag
      value: $(tasks.git-clone-task.results.commit)
  runAfter:
    - git-clone-task
  taskRef:
    kind: Task
    name: helm-deploy
  workspaces:
    - name: source
      workspace: source-repo
Each step can consist of:
nameUtilized for defining the objective of the step.taskRefDesignating the desired task for use (taskSpec can also be used directly)runAfterSpecifies the task on which the step is reliant (if absent, the step will be executed initially).paramsParameters transmitted to the task.workspaceAssigns the workspace(s) defined at thePipelinelevel to the workspace(s) used inside of theTask.
Note
The order in which the steps run in are determined by the steps in runAfter, not the order in which the steps are listed.
Running Our Pipeline
Important
Before running the pipeline the pipeline-scc account may need additional permissions.
This can be given with an admin account running: oc patch scc pipelines-scc --type merge -p '{"allowedCapabilities":["SETFCAP"]}'
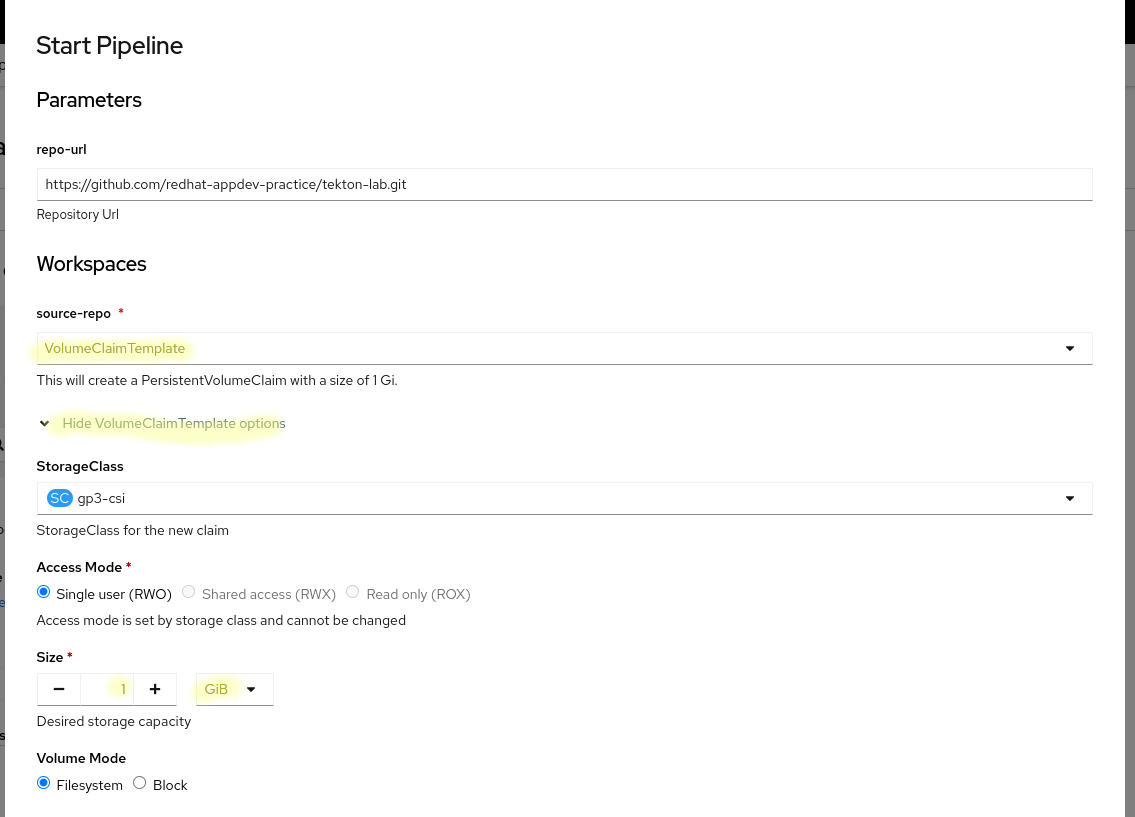
The pipeline can be initiated using either the Openshift UI or the command tkn pipeline start example-pipeline. Regardless of the method it requires two values:
- repo-url:
https://github.com/redhat-appdev-practice/tekton-lab.git - workspace: Explained Below
To facilitate the passage of code between the two tasks, persistent storage within the workspace is employed. The simplest approach involves creating a PersistentVolumeClaim and executing the pipeline using that claim. However, this approach can introduce potential complications. Firstly, multiple pipelines utilizing the same PVC could encounter conflicts. Moreover, a PVC is tied to a specific node, mandating that every task using that PVC runs on the associated node, which might lead to significant performance issues or node overload.
An alternative provided by Tekton is the use of a VolumeClaimTemplate (note that this option is not currently present in the tkn cli, but can be employed by creating the PipelineRun subsequently in this lab). The VolumeClaimTemplates generate fresh PVCs and bind them to each PipelineRun, based on a specified specification. This does necessitate the existence of either matching PVs for each newly created PipelineRun.workspace.volumeClaimTemplate specification, or a cluster configuration enabling dynamic provisioning.
Irrespective of the chosen approach, it is recommended to create a workspace with a minimum of 1 GB memory and initiate the pipeline:
Upon successful execution, you should observe the creation of a fresh Deployment and ImageStream. However, it's important to note that the pod within that Deployment might encounter an ImagePullBackOff error, which will be addressed in the subsequent section.
Automated Cleanup
The PVCs created by VolumeClaimTemplates will stay as long as the PipelineRun objects exist. The Openshift Pipeline Operator includes a configuration option that allows for the cleanup of taskruns and pipelineruns for a certain time period and/or number of resources. It is recommended that you setup this auto-pruning The PVCs generated through VolumeClaimTemplates persist as long as the corresponding PipelineRun instances endure. The Openshift Pipeline Operator incorporates a configuration parameter that permits the automatic removal of taskruns and pipelineruns based on a specified time period and/or resource count. It is advisable to configure this auto-pruning feature to ensure efficient resource management.
Expanding The Pipeline
To finalize the pipeline, we must incorporate two Task for image building and deployment to our ImageStream. As these actions are independent of the helm-deploy step, we can enable parallel execution by directly linking them to our git-clone-task. Please include the following steps into our example-pipeline:
Correction
This section lied a little, since our steps are both dependent on the same PVC the task will not actually run in parallel by default. There are work around such as using multiple PVCs but that will be beyond the scope of this lab.
    - name: maven-build
      runAfter:
        - git-clone-task
      taskRef:
        kind: Task
        name: maven-build
      workspaces:
        - name: source
          workspace: source-repo
    - name: build-and-push
      params:
        - name: image-name
          value: example-deploy
        - name: image-tag
          value: $(tasks.git-clone-task.results.commit)
        - name: namespace
          # It is important this match the namespace you deployed your pipeline in
          value: pipeline-example
      runAfter:
        - maven-build
      taskRef:
        kind: Task
        name: build-and-push-to-openshift-registry
      workspaces:
        - name: source
          workspace: source-repo
Make sure to modify the namespace parameter in the build-and-push step if you did not deploy to pipeline-example
TIP
The example repo cloned at the start of the lab contain the completed pipeline under .infra/pipeline if you are having trouble
Now restart your pipeline! If using the Openshift UI this can be done by navigating to the example-pipeline and choosing Action -> Start last Run. Or the following PipelineRun can be applied to the namespace
apiVersion: tekton.dev/v1beta1
kind: PipelineRun
metadata:
  generateName: example-pipeline-
spec:
  params:
    - name: repo-url
      value: 'https://github.com/redhat-appdev-practice/tekton-lab.git'
  pipelineRef:
    name: example-pipeline
  workspaces:
    - name: source-repo
      persistentVolumeClaim:
        claimName: example-workspace # Existing PVC
  # The following is how you would specify a VolumeClaimTemplate
  # workspaces:
  #   - name: source-repo
  #     volumeClaimTemplate:
  #       metadata:
  #         creationTimestamp: null
  #       spec:
  #         accessModes:
  #           - ReadWriteOnce
  #         resources:
  #           requests:
  #             storage: 1Gi
  #         # storageClassName: gp3-csi (Change to the correct Storage Class Name)
  #         volumeMode: Filesystem
Upon the successful completion of your pipeline, congratulations are in order. At this point, we will have accomplished the following: built our Java code, generated a Container Image from the Jar file, and orchestrated the deployment of this container within our Openshift environment.
To verify this deployment, ensure that it's active (you might need to remove the pod to initiate a re-pull of the image). Furthermore, you can access the application via the route output by echo http://$(oc get route/example-deployment -o jsonpath={.spec.host}) or found under Routes in the Openshift UI.
Conditional Task
A final valuable technique within Tekton involves utilizing the when condition on tasks. This empowers us to execute a task conditionally, dependent on user input or the outcomes of preceding tasks. To illustrate, in a "production" run of the aforementioned pipeline, it might be beneficial to incorporate a conditional task for deploying the image to an external repository.
Let's provide a basic illustration of incorporating a conditional task. Within your example pipeline, append a new task and configure the when condition to trigger the task solely when $(params.run-conditional) holds the value true:
Add the following under the params section:
    - description: Run my conditional step?
      name: run-conditional
type: string - name: conditional-task
runAfter:
- git-clone-task
taskRef:
kind: Task
name: conditional-task
when:
- input: $(params.run-conditional)
operator: in
values:
- 'true'Now rerun the pipeline with/without the run-conditional parameter set to true.
You will notice in the Openshift UI that when the parameter is not set you see >> on the task indicating that the conditional-task step was skipped.

Extra Credit
Tekton Pipelines have many more features we do not have time to cover. One more useful feature to know are tasking using the finally subsection. For extra credit add a cleanup task to remove our helm deployment upon completion of the pipeline.
Wrap Up
In this lab we created a slightly simplified version of a pipeline that might be used in a real environment. This pipeline can be easily expanded to include different types of testing and integrations into other devops products such a security scanners. In a future lab we will look into setting up integration hooks so pipelines can be automatically kicked off from non-manual sources such as a Git server.